13. Web application function
End of operation
TSUBAME3 is not in operation any more. You can find TSUBAME4 manuals here
This chapter describes how to use web applications such as Jupyter Lab on TSUBAME compute nodes.
13.1. Web service use function entrance
As a service entrance, "Use Web Service" is displayed in the menu on the left side and in the usage options on the group details screen.
13.1.1. From the menu
Web Service Usage" is displayed in the user information field of the menu displayed on the left side of the screen.
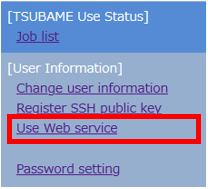
Click this link to move to the Web Service Usage Reception screen.
13.1.2. From the group detail screen
Web service usage has been added to the usage options on the group detail screen. Click the Settings button to move to the Web Service Acceptance screen.

13.2. Configuration of the Web Service Usage Reception screen
This section describes the configuration of the Web Service Acceptance screen.
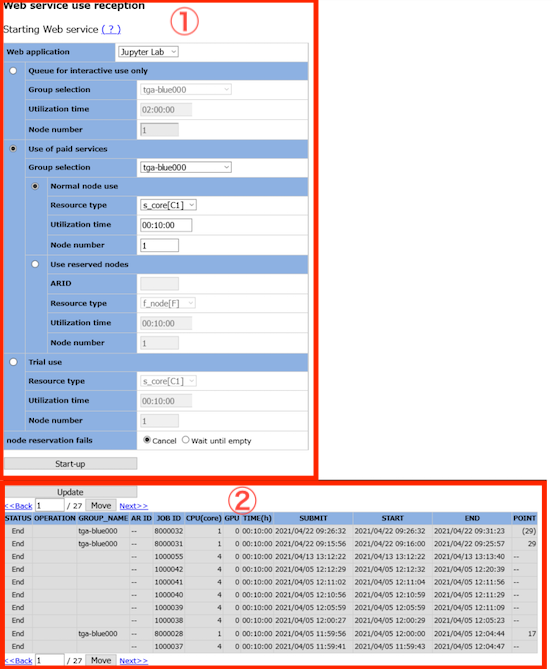
The Web Service Usage Reception screen consists of two parts: the usage registration interface and the list of registered jobs.
| No | Name | Description |
|---|---|---|
| 1 | User Registration Interface | Accepts the use of the Web service. You can set the resource type and execution time for use. |
| 2 | Job List | Displays a list of jobs that have been registered for use. You can check the status of each job and cancel it. |
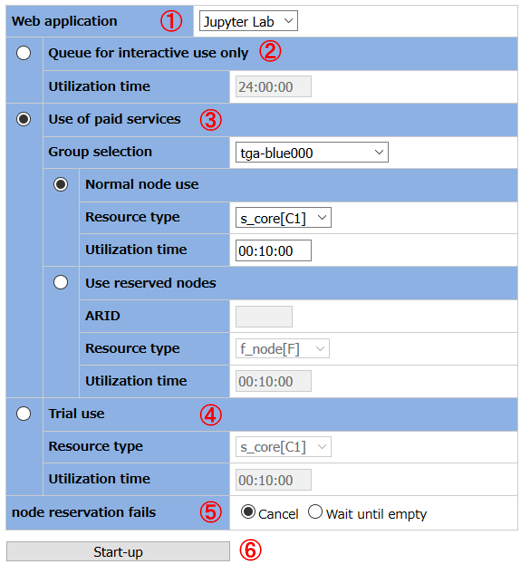
13.2.1. Web Service Acceptance Interface
This section describes the Web Service Acceptance Interface.
| No | Name | Description |
|---|---|---|
| 1. | Web Application | This is a drop-down list for selecting available applications. Currently, "Jupyter Lab" and "Code Server" are available.You can use "Jupyter Lab", "Code Server" and "noVNC". |
| 2. | Queue for interactive use only | Use the web service in the interactive use only queue. For off-campus users, the group selection drop-down will be selectable. For on-campus users, the group selection will be grayed out. The default usage time is 2 hours, but you can change the setting. The number of nodes used is set to 1 and cannot be changed. |
| 3. | Use of Paid Services | Select this option when executing a Web application using Group Points. There are two options: "Normal node use (shared)" and "Reserved node use (occupied)". There is no limit to the number of nodes used. There is no limit to the number of nodes used.In the case of reserved node use, points are not consumed in the execution of this application. |
| 4. | Trial use | This is a trial use of a web application using the tsubame-users group's "trial quota". The usage time is 10 minutes (fixed). The number of nodes is limited to 2. |
| 5. | Node reservation fails | Specify the action to be taken when the Web application execution node request fails. |
| 6. | Start-up | The Web service will start to be used under the entered conditions. |
13.2.2. About resource type
This function selects a computer resource. The selectable resource items differ depending on whether you are using a normal node or a reserved node. The available resource types are shown in the table below.
| Resource type | f_node [F] |
h_node [H] |
q_node [Q] |
s_gpu [G] |
s_core [C1] |
q_core [C4] |
Interactive [*] |
|---|---|---|---|---|---|---|---|
| Physical CPU cores | 28 | 14 | 7 | 2 | 1 | 4 | 7 |
| Memory size | 240GB | 120GB | 60GB | 30GB | 7.5GB | 30GB | 60GB |
| GPU | 4 | 2 | 1 | 1 | 0 | 0 | 1 |
| SSD | 1800GB beeOND |
900GB | 450GB | 224GB | 120GB | 225GB | |
| Available resource types(share) | ✓ | ✓ | ✓ | ✓ | ✓ | ✓ | ✓ |
| Available resource types(Occupy) | ✓ | ✓ | ✓ | ✗ | ✗ | ✗ | ✗ |
13.2.3. Execution time
Enter the time in "hour:minute:second" format. If it is entered in "HH:MM" format, it will be completed as "hour:minute:00".
13.2.4. AR ID
Enter the ARID of the reserved node where this Web application will be executed. This is required when using a reserved node. It is necessary to obtain the ARID beforehand by doing Node Reservation from the portal.
13.2.5. Other
The groups that can be selected in the group drop-down list are listed only for the group to which the user belongs. Only the groups to which the user belongs will be listed. The parameter areas other than the ones selected by the radio buttons are grayed out and cannot be entered.
13.2.6. Confirmation Dialog
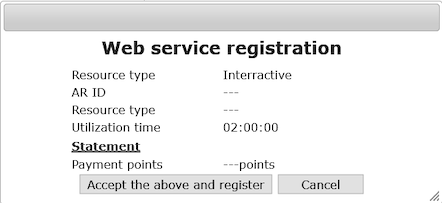
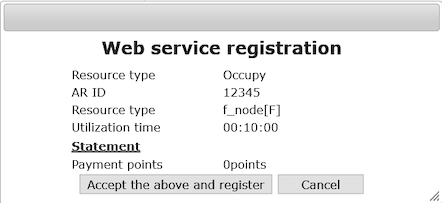
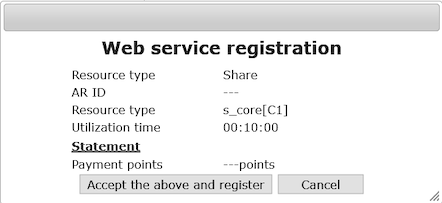
When you click the "Start" button, the contents of the dialog will change as shown below, depending on the input contents. The system will automatically determine and display the input values and all other information except where indicated.
| Resources used | Node reservation ID | Resource Type | Usage Time | Number of Payment Points | |
|---|---|---|---|---|---|
| Interactive Queue (on campus) |
Interactive Queue | -- | -- | Input value | -- |
| Paid (normal node) | shared | -- | input value | input value | Temporary holding point |
| Paid (Reserved Node) | occupied | input value | input value | input value | 0 |
| Trial Use | Share | -- | Input Value | 00:10:00 | -- |
Display example
- Queue for interactive use only
- Paid service use, normal node

- Paid service use, reservation node
- Trial use
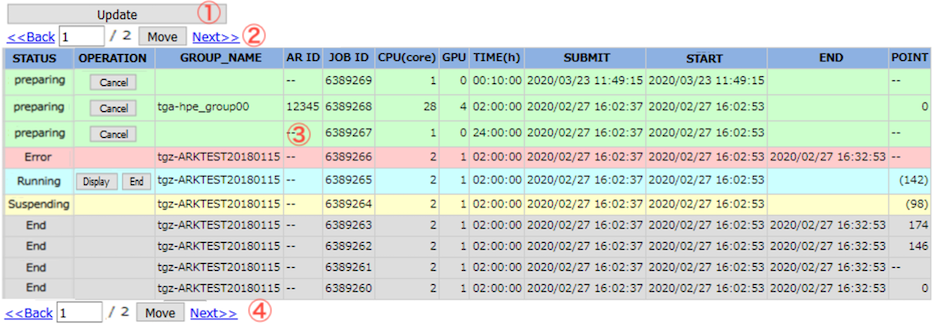
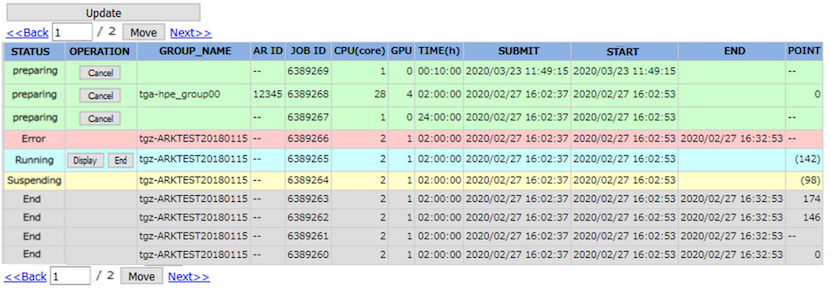
13.2.7. List of registered jobs
This section describes the list of jobs that have been registered for use.
| No | Features | Description | -- |
|---|---|---|---|
| 1. | Display update button | Update the contents of the list of jobs registered for use. | |
| 2. | Page selection menu (top) | Switch the page of the list of registered jobs. << Displays the previous page of one page. >> Displays the next page of one page. Jump to the page specified in the input field. |
|
| 3. | List of registered jobs | Displays a list of jobs that have been registered for use. The background color and the button display differ depending on the status. | |
| 4. | Page Selection Menu (Bottom) | Same as 2. Page Selection Menu (Top) |
| Item | Content |
|---|---|
| Status column | Displays the preparation status after registration. |
| Operation column | Displays the possible operation buttons according to the contents of the status column. |
| Group name column | Displays the group name in which the job was executed. The group name will be hidden during the trial frame (group name: tsubame-users). |
| ARID column | Displays the AR ID at the time of reservation execution. |
| JOBID column | Displays the job ID. |
| CPU(core) column | Displays the number of physical CPU cores according to the resource type. |
| GPU column | Displays the number of GPUs according to the resource type. |
| TIME(h) column | Displays the execution time of the job. |
| Registration column | Displays the date and time when the job was registered. |
| START column | Displays the date and time when the job was started. If the job has not started, leave this column blank. |
| End column | Displays the estimated end time of the job in gray. |
| POINT column | Displays the points to be used. In the case of other than paid use, "--" is displayed. While the job is running, it displays the fact that it is a temporary holding point with (). |
Background color for each record
Color according to the status:
preparing: green
processing: light blue
stopped: yellow
error: pink
finished: gray
Record Sorting
Sorts records so that the most recently received record is displayed at the top.
Display of error content
When the mouse is over the "Error" string, the contents are displayed as a tooltip.
13.3. Job and status
The operation column changes as follows depending on the job status.
Example of job display
| State | Operation | Contents |
|---|---|---|
| Preparing. | Cancel | Preparing for execution. Cancels the job before execution. |
| Processing | Display | Opens and forwards the operation screen of the Web service in a separate window. |
| Quitting | Cancels a job that is currently running. | |
| Stopping | - | The job is being stopped. |
| Finished | - | A job that has finished. |
| Error | - | Error Completed job. |
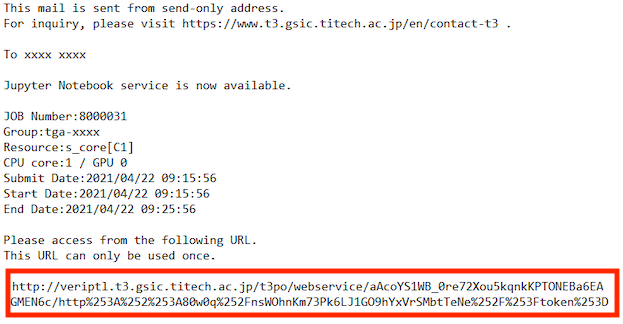
TSUBAME3.0 Web service connection URL will be sent when the status changes to "Processing". The content of the mail differs depending on the target Web service.
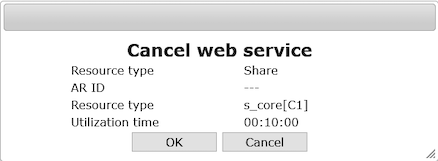
13.4. Registration cancellation dialog
After a job has been registered for use, the following confirmation dialog will be displayed when canceling the service while it is "preparing" or "running".
When the Cancel button is pressed
When the End button is pressed
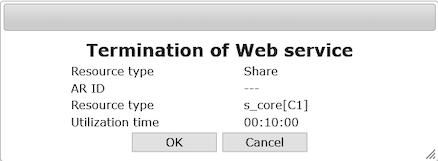
The content of the confirmation dialog changes as follows according to the input contents at the time of job submission. The system will automatically determine and display the values other than the input values.
| Resource used | Node reservation ID | Resource type | Usage time | |
|---|---|---|---|---|
| Interactive queue (on campus) |
Interactive Queue | -- | -- | Input value |
| Interactive queue (off-campus) |
Interactive queue | -- | -- | Input value |
| paid | Normal Node | Shared | -- | Input value |
| reserved node | occupied | Input value | Input value | |
| Trial Use | Shared | -- | Input value | 00:10:00 |
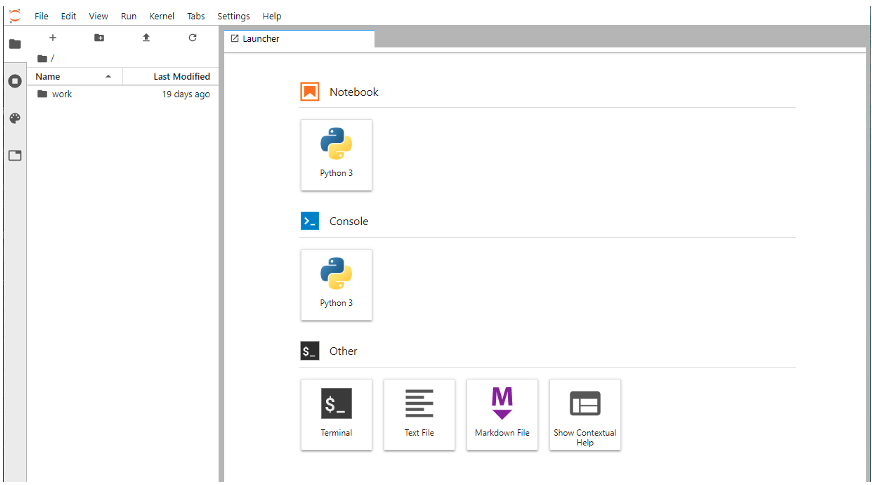
13.5. Jupyter screen display
When you click the URL of the TSUBAME3.0 Web Service connection notice mail or the "Job List" button, the Jupyer screen is displayed in another window.
You can use the URL of the TSUBAME3.0 Web Service Connection Notice Mail only once, and use the Job List button on the portal screen to connect to Jupyter after the second time.
Notice mail(juypter)
Jupyter startup screen
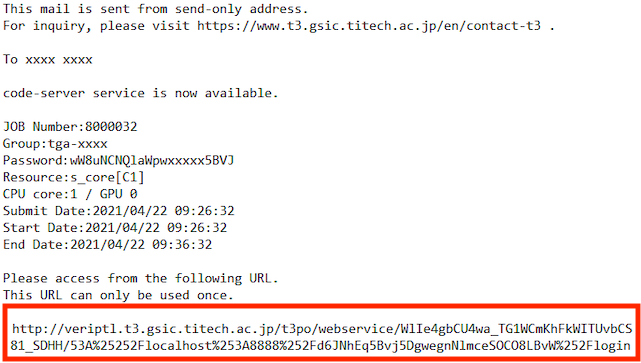
13.6. Code Server screen display
When the URL of the TSUBAME3.0 Web service connection notice mail or the display button of the job list is clicked, the Code Server login screen is displayed in another window.
You can use the URL of the TSUBAME3.0 Web service connection notice mail only once, and use the "Job List" button on the portal screen to connect to Code Server for the second time or later.
Notification mail (Code-Server)
Code Server Login Screen
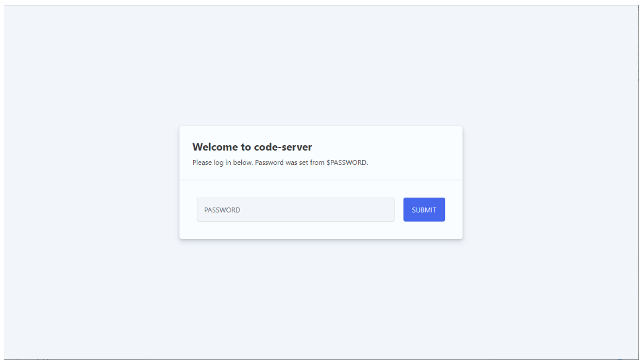
Please note that you will need to enter the password provided in the email to login to the Code Server. Enter the password and click the SUBMIT button to log in to the Code Server.
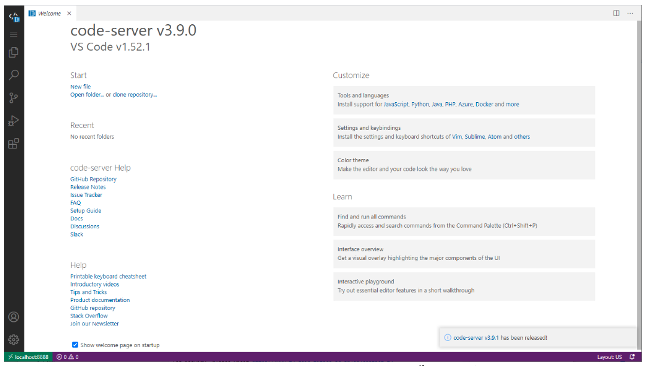
Screen after Code Server login
13.7. Web Service Specific Description
For Jupyter Lab specific description, please refer to Jupyter Lab User's Guide.
13.8. noVNC screen display
When you click the URL in the TSUBAME3.0 Web service connection URL email or the View Job List button, the noVNC login screen will appear in a separate window.
The URL in the TSUBAME3.0 Web Service Connection URL email can be used only once. Use the Show button in the list of jobs.
noVNC login screen

password input window
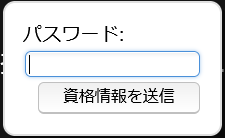
Note that to log in to noVNC, you will need to enter the password provided in the e-mail.
(In multiple sessions, the password in the last email sent will be valid for all sessions.)
Enter your password in the dialog that appears after clicking the "Connect" button and click the "Send Credentials" button to log in to noVNC.
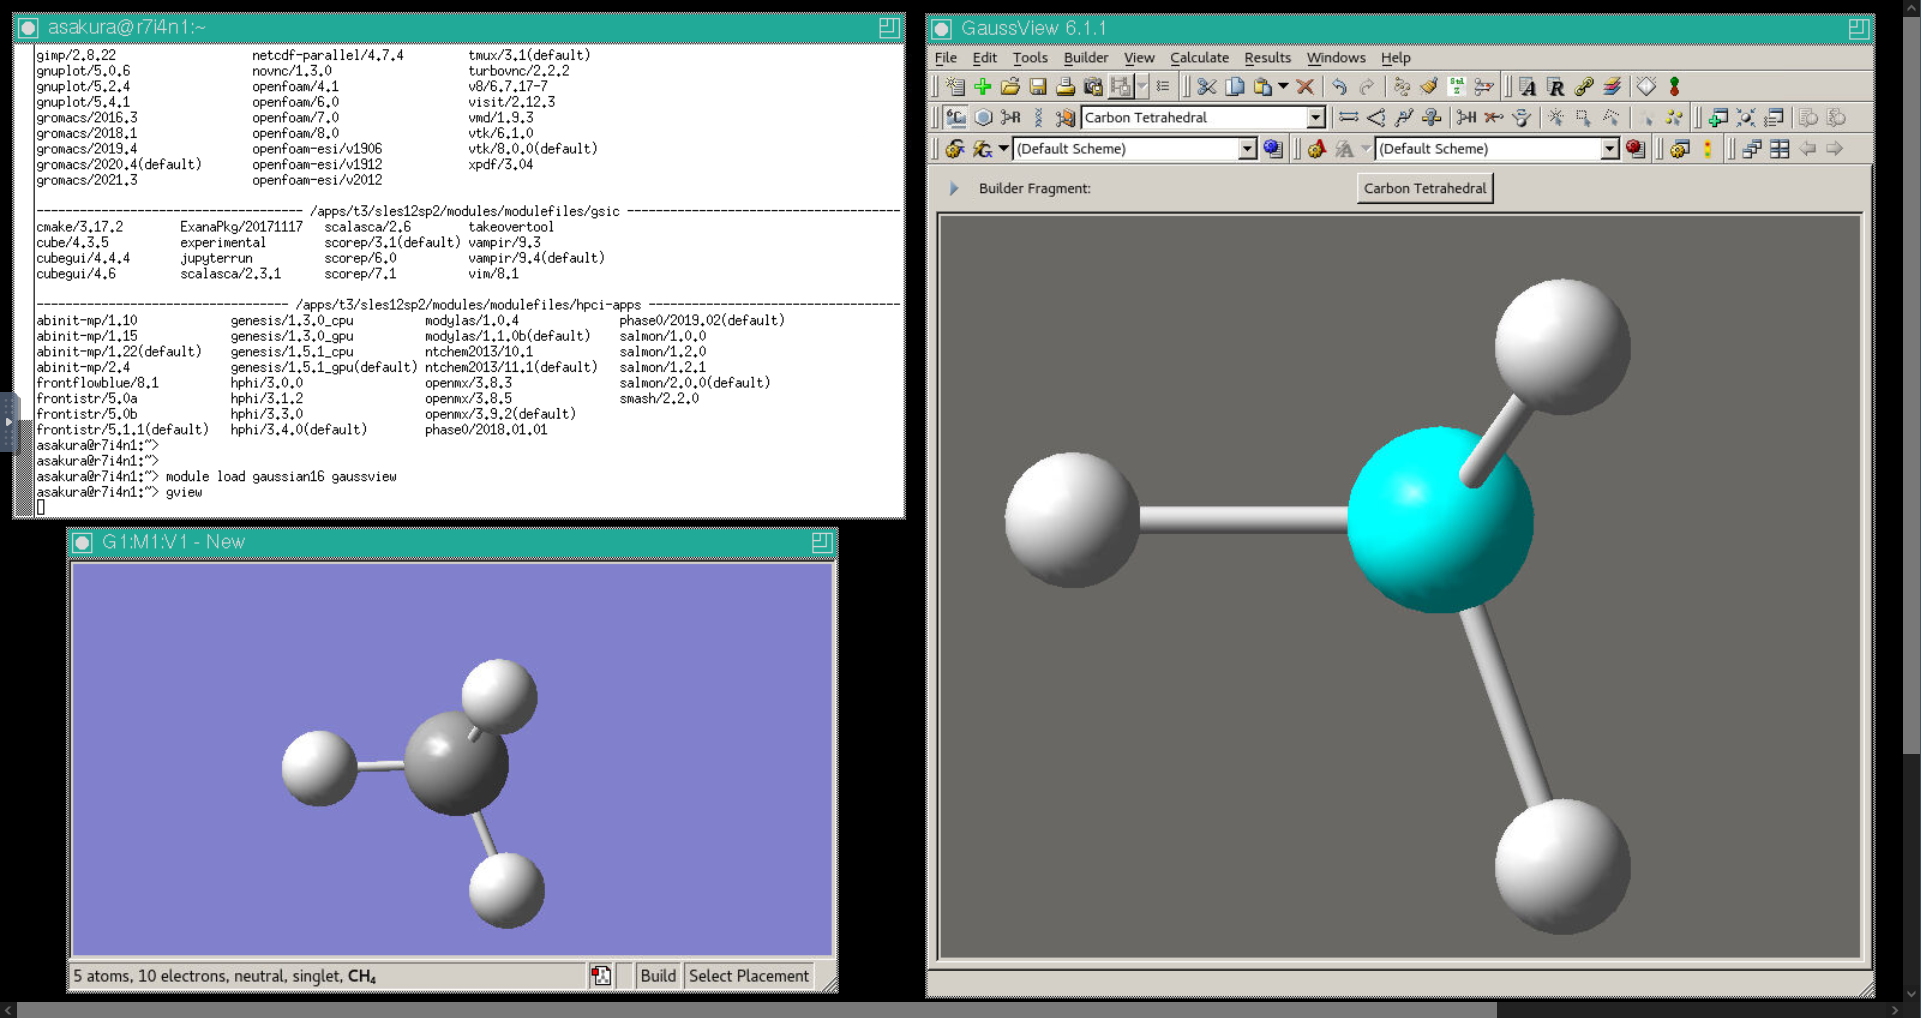
(The following figure shows an example of GaussView started within noVNC.)
screen after noVNC login